In November 2012 I published a tool which decrypts configuration backup files of Sphairon-based routers. This tool was mainly used by o2 customers who wanted to extract their VoIP login data so they could use any router they prefer – without being tied to the devices supplied by o2. However, as of December 2013 o2 started to roll out a new firmware version (2.12.26.1). With this version they simply stripped all relevant login data from the configuration backup files.
In this post I will show you how you can gain root access to your o2 HomeBox 3232. Using the root access you can easily extract your VoIP credentials, even if you are on firmware version 2.12.26.1. As usual, you will find a German translation of this tutorial in a condensed form at the IP-Phone-Forum.
Things that we will need:
- o2 HomeBox 3232 connected to the internet
- Windows PC connected to the HomeBox
- PuTTY and PuTTYgen (dl putty.exe and puttygen.exe from here)
- Sphairon Crypto Tool v0.03 (formerly known as “IAD Decrytper”)
Downloads:
Generation of key pair
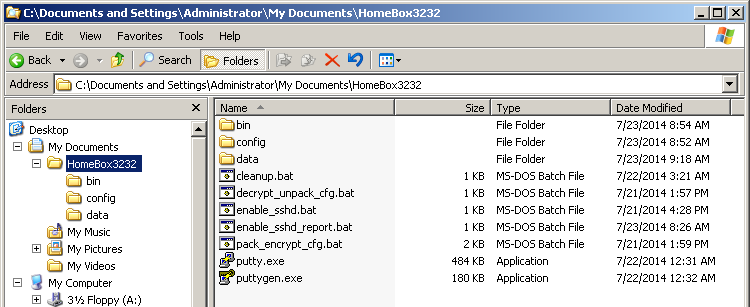
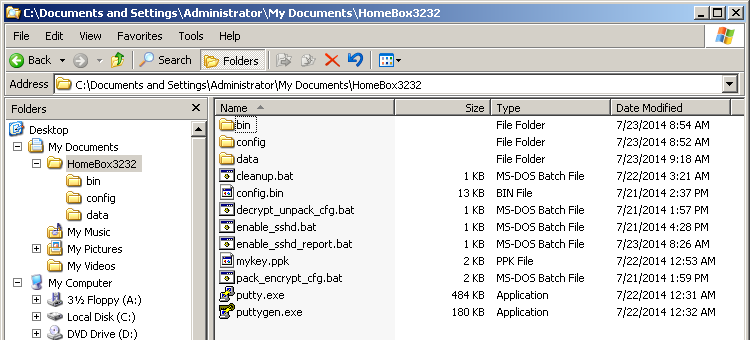
Download and extract the Sphairon Crypto Tool to a directory of your liking. Download and save PuTTY and PuTTYgen to the same directory. Your folder should look like this:
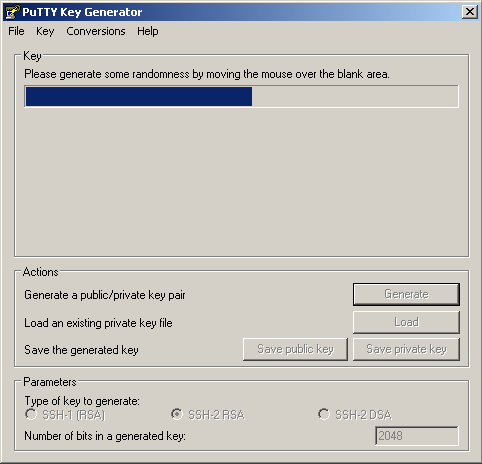
Now start PuTTYgen, select “SSH-2 RSA” and choose 2048 bits. Click on “Generate”, then move your mouse around in the blank area.
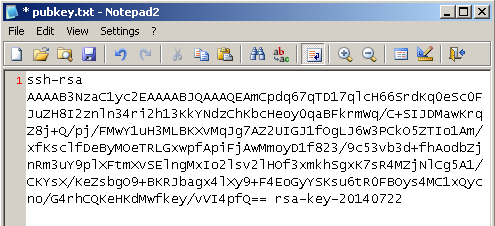
When the generation is done, right-click into newly generated public key, and choose “Select All”. Then, right-click again and choose “Copy”.
Without closing PuTTYgen, navigate to the data directory and open the empty file pubkey.txt. Now paste your public key into that file, then save and close it. (Note: I am using Notepad2 instead of MS Notepad, but MS Notepad will do fine as well for this task.)
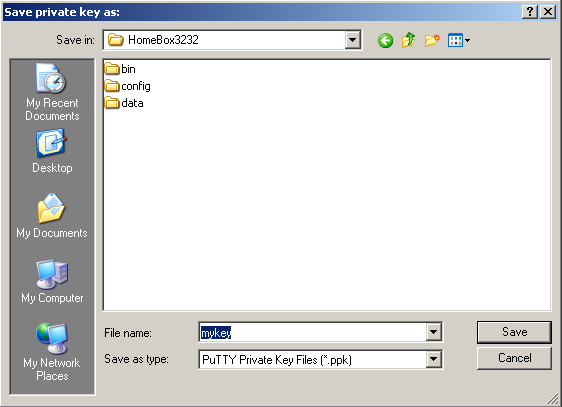
Return to PuTTYgen. If you want, you can protect your key with a passphrase, but I will omit this step as this keypair is only a temporary one for breaking into the router. Anyways you should keep the private key (*.ppk file) secret. Click “Save private key” and save it without passphrase. After that you can close PuTTYgen.
You now have successfully generated a keypair which we will later use for SSH access to the router.
Enabling SSH access
The next step is to enable SSH access. Each config.bin which you download from your o2 HomeBox 3232 contains a file called rc.conf. This file has various configuration options like SSH_LAN_ENABLE, TELNET_LAN_ENABLE and so on. Unfortunately we cannot use these options right away as the firmware prevents execution of the Dropbear SSHd on LAN for production type devices. Getting the device into debug mode would require a change to the bootloader options and that would require a way to write to the flash chip. In addition you would risk bricking your router if you mess this up.
Instead, we will do this via a bug in the configuration file handling in the router. The idea is to give the router a specially crafted configuration file which will trigger the bug and enable an SSH daemon for us.
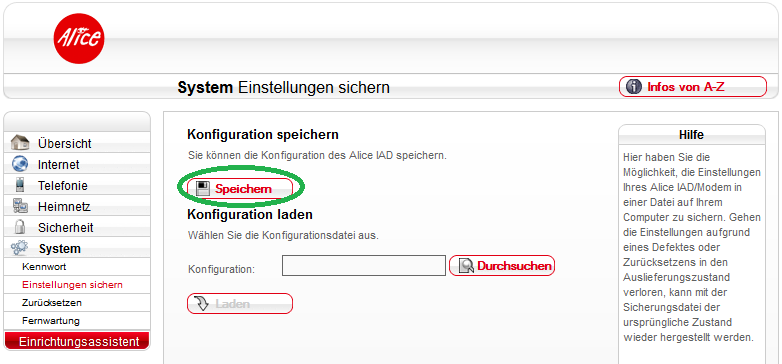
Log into your router on http://o2.box/ to download a copy of your configuration.
Note: My screenshot shows an old Alice firmware version (2.12.14), but this procedure works equally well on the most recent o2 firmware 2.12.26.1.
Save it to the same folder that contains your private key. Your folder should now look exactly like this.
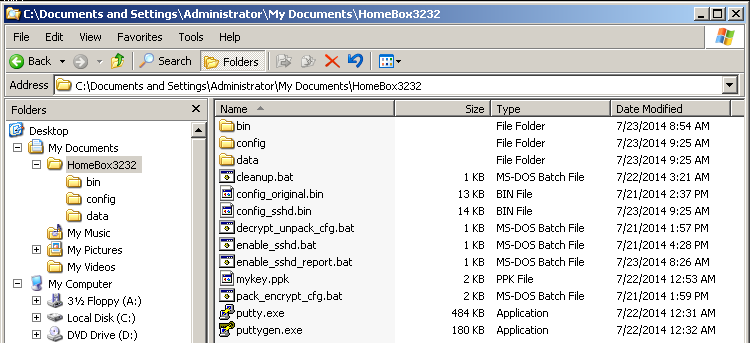
Now execute the batch file enable_sshd_report.bat and let it do its magic. It will generate a new file called config_sshd.bin and store your old configuration as config_original.bin. In addition, a report of this step will be created.
How the “exploit” works: enable_sshd_report.bat decrypts your configuration file. It then appends code for SSHd startup, public key authentication and firewall modification to the option SYSLOGD_CMDLINE in rc.conf. Finally, the manipulated rc.conf is encrypted and saved as config_sshd.bin. Primarily SYSLOGD_CMDLINE is intended to hold command line parameters for the syslog daemon. But due to a lack of input checking, any shell command that you append will be executed.
Go back to the webinterface of your router and upload the config_sshd.bin. Your device will reboot automatically after the upload.
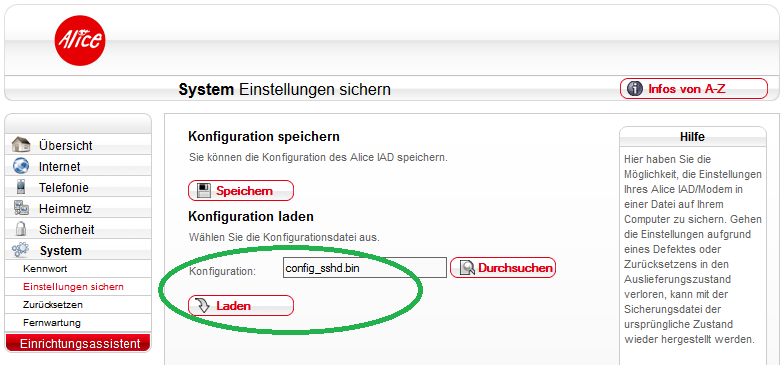
Note: My screenshot shows an old Alice firmware version (2.12.14), but this procedure works equally well on the most recent o2 firmware 2.12.26.1.
If you want to disable the SSHd again, read below.
Setting up PuTTY for SSH access
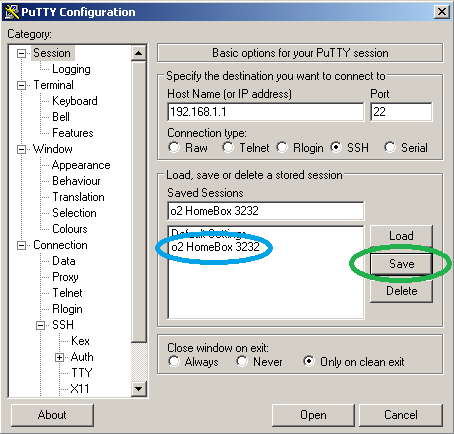
Your router should now have restarted and the Dropbear SSHd should be accepting connections. Start PuTTY. Assuming that 192.168.1.1 is the IP address of your router you can copy all settings (green) from the following screenshot. Then click on “Auth” (blue).
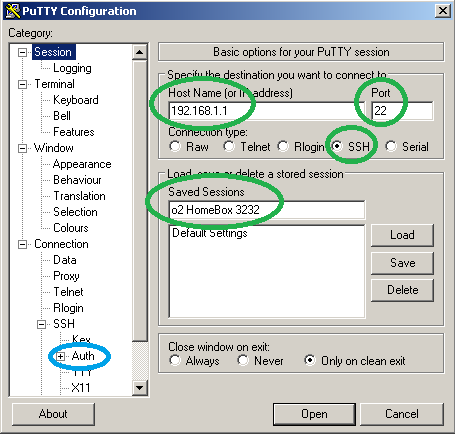
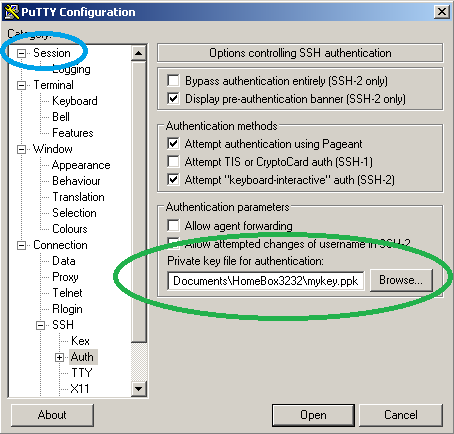
Browse for the private key (*.ppk file) that you created earlier (green). Then click on “Session” (blue).
Hit “Save” (green) and double-click on “o2 HomeBox 3232” (blue).
Answer the question of trust with “Yes” and you should be prompted to log in. Type “root” (without quotes) and hit return.
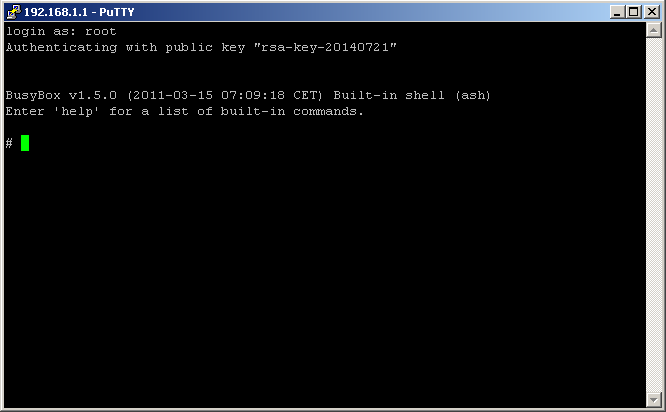
Congratulations. You now have root access to your o2 HomeBox 3232.
Extraction of VoIP data
Using the following commands you can conveniently print the VoIP login data to the shell. Just paste them into PuTTY by right-clicking into its window when it shows “#”. Then, hit return.
sed -n "/\[SipAccount\]/,/\[Codecs\]/p" /flash/database.txt
sed -n "/PPPOE1_USERNAME\=\"/,/PPPOE1_PASSWORD\=\"/p" /flash/rc.conf
sed -n "/PPPOE2_USERNAME\=\"/,/PPPOE2_PASSWORD\=\"/p" /flash/rc.conf
In my case the first command produces the following output:
# sed -n "/\[SipAccount\]/,/\[Codecs\]/p" /flash/database.txt
[SipAccount]
0;0;"xxxxxxxxxxxx";"xxxxxxxxxxxx";"yyyyyyyyyyyyyyyyyyyyyyyyyyyyyyyy";"";4500;1;0;"";0;0;0

[SipProvider]
0;0;1;2;0;"Hansenet";"sip.alice-voip.de";10000;19000;1;"1/20_12_5";1;0;0;1;"";0;0;0;1;1;"";1;1;0;0;0;0;0

[SipServer]
0;"registrarZZ.sip.alice-voip.de";5060
1;"registrarZZ.sip.alice-voip.de";5060
2;"registrarZZ.sip.alice-voip.de";5060

[Codecs]
Under [SipAccount] you find my username twice (xxx…) and my password (yyy…). My Proxy is “sip.alice-voip.de” as in [SipProvider]. “registrarZZ.sip.alice-voip.de” is my registrar and it is stored under [SipServer].
The second and third command reveals the username/password for each PPPoE circuit and the result should be self-explanatory.
# sed -n "/PPPOE1_USERNAME\=\"/,/PPPOE1_PASSWORD\=\"/p" /flash/rc.conf
PPPOE1_USERNAME="xxxxxxxxxxxx@alice-dsl.de"
PPPOE1_PASSWORD="xxxxxxxx"
# sed -n "/PPPOE2_USERNAME\=\"/,/PPPOE2_PASSWORD\=\"/p" /flash/rc.conf
PPPOE2_USERNAME="xxxxxxxxxx-xxxxxx@alice-voip.de"
PPPOE2_PASSWORD="xxxxxxxxxx"
With these credentials at hand you should be able to set up your own router for o2 VoIP telephony. If you need further assistance with the setup, please consult this thread in the IP-Phone-Forum (step 6).
Disabling SSH access and removing traces
If you simply want to disable the SSH daemon, it is enough to upload the config_original.bin through the webinterface. However, if you want to remove all traces of the manipulation (e. g. you want to RMA your device), you have to do the following:
- Log into your router via PuTTY.
- Issue the following commands:
rm /flash/pwned
sed -i '2d' /flash/authorized_keys
- Upload config_original.bin through the webinterface of your router.
After the reboot, all traces of the manipulation will be gone.
Acknowledgment & other thoughts
I would like to thank the user Black-Roses from the IP-Phone-Forum for testing this procedure on the most recent o2 firmware.
Once you have SSH access enabled, there are several other interesting things you can do:
- dump the whole flash (for example to a USB thumb drive)
- up and downgrade to other firmware versions
- lock out o2 from SSH by removing their key from /flash/authorized_keys
- disable TR-069 functionality
- gain more understanding of the firmware and build a custom one with extended functionality
If you have any other ideas or plan to investigate any of the above, I would be glad to hear from you. 🙂
Update 2014-07-29: If you want to make your own manipulations on the rc.conf, you can do so through SSH by editing the file /flash/rc.conf with vim (reboot, after you are done). Alternatively, you can use the batch files decrypt_unpack_cfg.bat and pack_encrypt_cfg.bat. This way, you can unpack your config.bin, modify the files in the config directory and repack them again.
Comments are closed.